

Paradox is one of my favorite tangles and I seem to do it rather well. Perhaps those two things are related! :-) I've been asked about it occasionally, how did I do this or that. I thought about doing a video but that's just a bit more than I can take on right now. So I decided to post some tips and ideas here, and hope to make them clear enough.
TIPS!
TIP #1:
The elegant curves show best if the lines are close together. See the difference.
TIP #2:
Agh! But what if you accidentally leave too much space between some lines? Simple! Just add a line or two between the ones that are too spacey, like this:
Then again, never say never. I tried deliberately leaving wide spaces that I then filled with other tangles. You can see the results here.

TIP #4:
There are two looks that can be achieved with Paradox. In my classes I call them "Fans" and "Twists". Here they are:
Paradox is essentially a square or triangular spiral. These two effects are obtained depending on which direction you send your spirals.
TWISTS: Regardless of whether you spiral clockwise or counter-clockwise, if you spiral in the same direction in every section you'll end up with twists.
FANS: To get the fans you need to spiral in the opposite direction from section to section.
 |
| Starting with squares |
 |
| Starting with triangles |
TIP #5:
Munchin is a tangle that flows particularly nicely placed next to Paradox. Others that could work well this way are Tri-po, Facets, possibly Hibred (scroll down the link). I can also see possibilities for Tripoli (another of my favorite tangles) and Betweed. |
| This is a rectangle divided in three. The red arrows show where the divisions are. |
AND THEN SOME!
THEN SOME #1:
Paradox also makes a nice border design. Start with a row of squares or triangles, then decide whether you want fans or twists.
THEN SOME #2:
An interesting variation is to fill in every other stripe. Don't do this going around the spiral the way you did the tangle. It's too easy to get confused that way. Begin on one side and fill in to the center, then move on to another side.
THEN SOME #3:
The triangles or squares you use don't all have to meet neatly at the corners. Interesting things happen when they're placed randomly. You can also use a mix of triangles and squares.
THEN SOME #4:
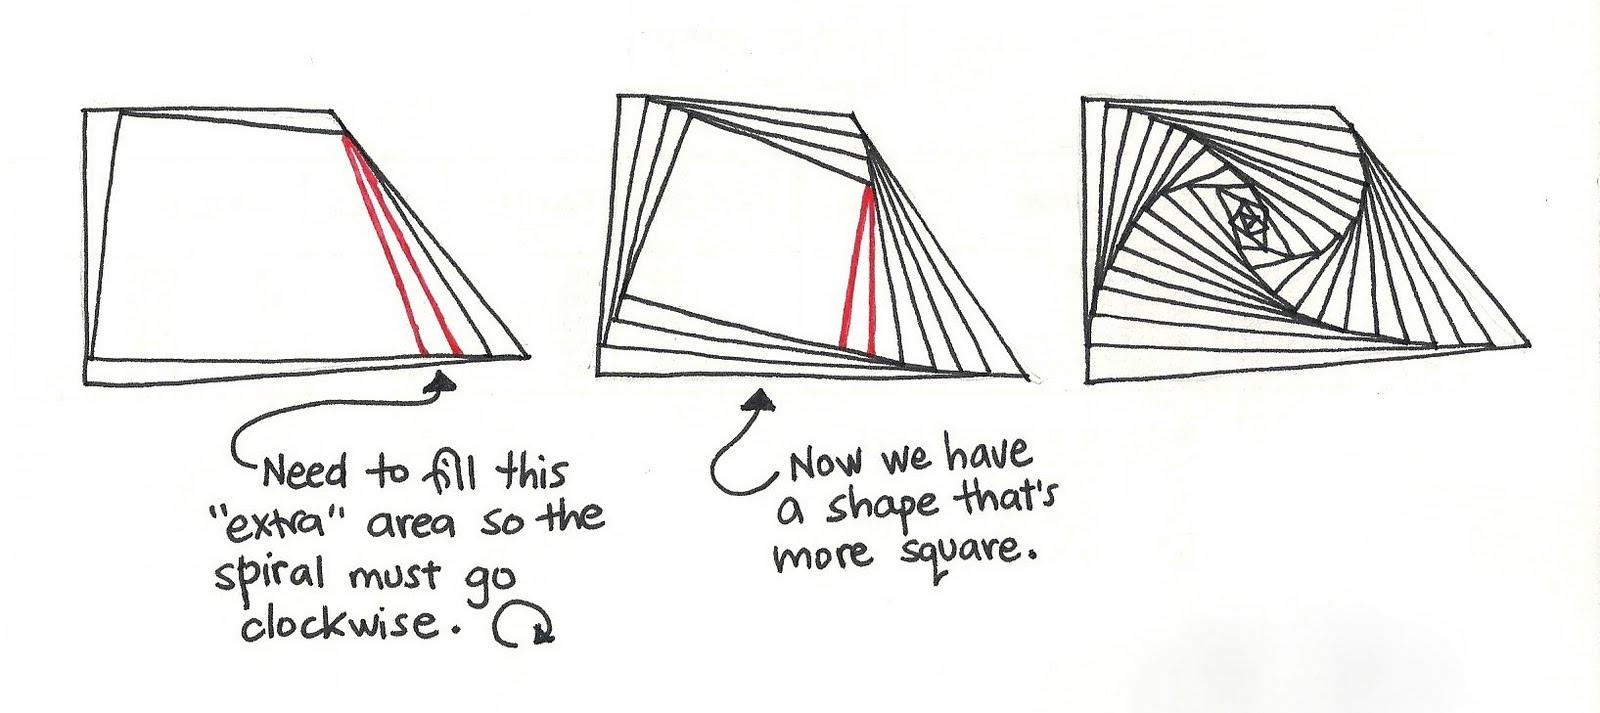
Sometimes when I'm doing Paradox using squares there's an odd-shaped section, like a trapezoid. (What a great word!) I've found a few ways of dealing with this challenge.One thing you can do is separate that end bit and deal with it on its own. This leaves a triangle and you can fill it in a number of ways:
1) fill the triangle with Paradox with a twist effect
2) fill the triangle with Paradox with a fan effect
3) fill the triangle Munchin style to extend the fan
4) fill the triangle Munchin style in the other direction

Another option is to fill the odd shape entirely with Paradox, adding an extra line or two occasionally as you're spiralling around. You need to think about the direction of the spiral in order for the extra lines to fill the proper space. The aim is to get the (temporarily) empty center area looking more like a regular square.
THEN SOME #5:
Never say never, right? While the classic Paradox is done entirely with straight lines - thus the paradox - it can also be done using curved lines. It takes a little more concentration.
If you're feeling confident, here's something to try: partial Paradox! This requires imagining what's not there, but (of course) it doesn't have to be exact or perfect. Here you can see:
1st: a string
2nd: other tangles (Crescent Moon, Florez, Keenees, Prestwood, Tripo), with two sections left blank. The solid green line makes a nice square in the section where I want to put Paradox. Normally I'd draw it in black. Then there's a dotted green line where I need to imagine the far edge of the other Paradox square.
3rd: one and a half Paradoxes and the final section filled with Gingham

THEN SOME #7:
Paradox in a paradox. See the Paradox section in the lower left of the tile below? Going from the point in
the center, there's a Paradox triangle, a Paradox
square, and a partial Paradox. In the square section I did Paradox until
about halfway in, then, I reversed direction! Cool! |
| Other tangles here: Moving Day, Ninja Stars, Screen - all mine! |
FINALLY
Here's a pencil string, some notes about what I did, and the Paradox result:

There are more examples of Paradox in other Zentangle newsletters here (scroll down) and here (scroll down).
I was about to throw out all the examples I did for this post when I thought, "Hmm. Let's stick 'em all together and see what happens." So here it is, the all-in-one (minus one) Paradox visual tutorial!

HAVE FUN! (and congratulations to anyone who stuck through it to the end!)
THIS JUST IN!
August 2011: For another take on Paradox, using a two-sided shape (how cool is that!) see the Zentangle blog post for August 26.
June 2012: for a cool variation that I call feathered Paradox see my blog post of June 22, 2012
August 2018: See Rick Roberts' post "Paradox Metaphors" here.
April 2020: Another variation, Crazy Paradox, here on my blog.
EXCELLENT tutorial, Margaret! Thanks for covering all the angles ;-)
ReplyDeleteWonderful post! I've always liked paradox but you've given me some neat new ideas. Thanks.
ReplyDeleteWonderful tutorial, thanks!
ReplyDeleteWOW! You really put a lot of work into this tutorial and it is excellent! I'm printing this out next for my tangle binder. I don't know why I have always limited my Paradox to a triangle shape, but can't wait to try out these ideas. Thanks so much, Margaret!
ReplyDeleteI love Paradox too! Awesome tutorial Margaret!
ReplyDeleteWow, Margaret, what a great resource. So much we can do with one tangle!
ReplyDeleteFurther 'deconstructing' Paradox and explaining different design options is a great help... and it fires the creativity to find even more options and pattern variations. This is a great idea, Margaret... and you did it so beautifully. Thank you.
ReplyDelete(Looking forward to your [some day] video tutorials.)
Thank you so much. I needed that.
ReplyDeleteI love Paradox, too, but always have trouble with it.
Barbara
I am new to Zentangles and am amazed to have found your wonderful tutorials. Thank you for so generously sharing your gift with others!
ReplyDeleteZippity-doo-dah!! Thanks Margaret, I am certainly going to do more Paradoax, you have me inspired!
ReplyDeleteWord verification: yoliquen
Glad it's been helpful! I've already thought of a couple of things I didn't say, but oh well, maybe you'll discover them on your own. And other possibilities too!
ReplyDelete--Margaret
Thank you Margaret! I love the way you break you tutorial down and explain the steps; I appreciate the work you put into creating it. I also appreciate how generously you share your insight.
ReplyDeleteMy *word*, Margaret. That is a *lot* of work, and an absolutely amazing tutorial. You've done some things with this I never thought of. Wow. Thank you.
ReplyDeleteVery nice post, I will use your ideas at my next class. This Wednesday. Thanks so much. I love Paradox but you took it one step beyond!
ReplyDeleteWow, you are so kind to share all of this information with us. The instructions are so easy to follow and there are so many variations. I am definitely going to delegate some hours this weekend to learn all I can. Again, THANK YOU!
ReplyDeleteBev in Utah
Wow, thanks for your tute. I'm new to zentangle and really enjoy your tips. I imagine your classes are great!
ReplyDeleteThank you, thank you, thank you. I love paradox and have used it in many of the ways you suggest. But there are some new and exciting ideas here that I'll be sure to try.
ReplyDeleteThis is fantastic - paradox is one of my favourites and took the longest to master while Rick patiently helped me!
ReplyDeleteJane Marbaix CZT 6
Thanks so much for all that info. It will keep me out of mischief for ages as I work through it all, plus pass on to my art and craft group. You make it all seem so simplpe too, thanks again for the fun time I will have doing these exercises.
ReplyDeleteWell done, Margaret! You really covered everything (and then some!) I especially like the fans and columns portion. Mine come about by accident, but now I can be more aware of the direction and be more deliberate if I want. Thanks for this most generous post!
ReplyDeleteWhat wonderful tips. Thanks so much for sharing this!
ReplyDeleteJust, WOW, Margaret! So much to share, and so much for me to play with!
ReplyDeleteThanks!
Now that's about as complete as it gets. So useful. Thank you for sticking with it to teach us all.
ReplyDeleteThanks for this wonderful tutorial. While I've done most of these paradox styles I have never written them down in the succinct form you have provided in this post. Also I've never started with a string made up of rectangles and triangles on purpose as in "and then some #3" shows. Excellent! Bette Abdu, CZT
ReplyDeleteWow - you really studied the details of Paradox. -Also when you colour in every other stripe of adjacent paradox triangles, you can get an interesting "eye" effect:
ReplyDeletehttp://mulles-univers.blogspot.com/2011/08/et-paradox.html
One of the first zentangles I ever made, actually...
I seem to have eyes looking out at me from every zentangle I make. Wonder what that means :-D
Awesome! It's like the Paradox Bible. Or would it be a Paradox Parable? Mixed metaphors are dangerous... it's very complete and very impressive!! :-)
ReplyDeleteThank you so much for this tutorial, I had tried to get this effect and failed every time as i did not realize how it was created. Off to try it out now.
ReplyDeleteVery best wishes
Thank you so much for this wonderful tutorial. Paradox is one of my favorite tangles.
ReplyDeleteThank you so much for this fantastic inspiring tutorial! ! !
ReplyDeleteThis was a really good and needed tutorial on Paradox. It is truly one of those "magical" tangles that is very impressive when done as it was designed. Most tangles you can ad lib or change it here or there, but Paradox, you have to follow through the steps or it doesn't "work". Thanks for putting it into such simple and deliberate words and images for all our tangling family. I am looking forward to seeing more Paradoxical vistas in the future! Margaret, the images you created are really beautiful! Maria
ReplyDeleteYOU are the Paradox Queen!!! Thanks for taking all that time to share your knowledge. Great post!!!!!
ReplyDeleteMargaret -- I am humbled by all the time and effort put into your Paradox presentation to us. It is absolutely awesome and you are so generous to share it with us. Thank you.
ReplyDeleteI absolutely love paradox (once I figured it out!) but I didn't know how to get the 2 variations with the columns or fans. This is such a comprehensive and helpful tutorial - THANK YOU. I so appreciate that you took the time to make it so clear. I can't wait to expand my paradox offerings!
ReplyDeleteThis tutorial is AMAZING!!! Thank you Margaret for being such a fantastic teacher! I love Paradox and can't wait to try the columns and fans!
ReplyDeletethank you, thank you, thank you. I often get lost with this and I love the effect. I am one that has to add extra lines to fill in the gaps LOL, now I don't feel like I am doing it wrong.....
ReplyDeleteabsolutely breathtaking!
ReplyDeleteWozer - what a fabulous and detailed tutorial - and so beautifully illustrated. Now that IS value added for sure. Isn't the Internet and amazing place at times. thanks for doing your bit!!
ReplyDeleteBest
Ruby
This tutorial was zen-fastic!!! The infomation was phenomenal, a garden of inspiration. Thank you so much!!! Time to pick up a pen...
ReplyDeleteMargaret, I am a bit late at posting a comment, but this is a wonderful tutorial. I teach Zentangle once a month at my Library and this is just what I needed for this months class. I love Ricks Paradox and have people ask all the time "how did you do that" I think my class will love this step by step Paradox lesson. Thanks.
ReplyDeleteI am also new to Zentangle, and cannot wait to try this. In fact, I'm headed to the "drawing board" right now! Thanks!
ReplyDeleteThis is such an amazing piece of instruction. Thank you so much. Brain is whizzing but under your expert tuition I'll have a go! x
ReplyDeleteThank you, Margaret, for your excellent tutorial on Paradox. I love all the different effects, and you have described and presented them so beautifully. I'm inspired!
ReplyDeleteWhat a fabulous resource! I wasn't a paradox fan but you've given me new insight into this tangle.
ReplyDeleteA question about shading - does it ever require/do better with shading or do the lines do all the work themselves?
(I just realized that this reply was posted as a comment, not as a reply! So sorry. I hope you saw it anyway.)
DeleteAhh ziggiau, that's something I didn't cover! (There are other things, and I'm considering a follow-up post.)
Paradox looks lovely with shading around the curves. I will say "inside" the curves and hope that's not confusing. If you have 'fans', shade inside the 'fan'.
I also shade it, as I do any tangle, at the edge beside another tangle when I want Paradox to 'go behind'.
Ahh ziggiau, that's something I didn't cover! (There are other things, and I'm considering a follow-up post.)
ReplyDeleteParadox looks lovely with shading around the curves. I will say "inside" the curves and hope that's not confusing. If you have 'fans', shade inside the 'fan'.
I also shade it, as I do any tangle, at the edge beside another tangle when I want Paradox to 'go behind'.
Once again your instruction have my brain buzzing, thankyou so much for the free lessons it's wonderful :O)
ReplyDelete{{{{BIGHUG}}}}
Thanks for this great turorial! It was a big help to draw Paradox fans this time.
ReplyDeleteJust love this one; thanks for doing the tutorial.
ReplyDeleteYOU are amazing! What a resource.I'm going to link to this page. Do you realize how much time you have just saved me trying to figure it all out?
ReplyDeleteThank you so much for posting this! Great instructions!
ReplyDeleteThank you for sharing this tutorial. I am new to zentangle and this tutorial has been very helpful and inspirational.
ReplyDeletehugs julie
Excellent tutorial!
ReplyDeleteI'm so new to tangles, I forgot the mantra--"There are no mistakes in Zentangle"--and was thinking I was "ruining" my drawings when I accidentally did a Paradox without turning in the "right" direction. However, I now see I was making a Twist. I love this form of art; it's new and fresh every single time, and there truly are no mistakes!!
WOW! This just blew me away! Never saw such useful material before. What a blessing. Love it!!!
ReplyDeleteThis is way too much great fun, thanks so much with sharing.
ReplyDeleteJust took my very first zentangle class today--this tutorial is awesome! I'm hooked!
ReplyDeleteI came across this post via tanglepatterns.com - "how to draw PARADOX" and just want to say O M G! I am new to the art of Zentangle - and have fallen in love with paradox...but had questions on a few aspects of how some of the designs I saw were created This answered all of my questions AND THEN SOME. I'm can see I'll be spending my evening deeply tangled! Thanks for just a detailed set of descriptions.
ReplyDeleteI'm so happy that this has been so helpful to so many people!
DeleteI just found this article from a link on Tanglepatterns.com. All I can say is, thank you so much for taking the time to do this! It has been soooooo helpful, and de-mystifying for me. I appreciate it so much.
ReplyDeleteBrilliant! Thank you.
ReplyDeleteWow! What fun. Thanks!
ReplyDeleteParadox is my favourite zentangle pattern! So much fun.
ReplyDeleteI am not a committed 'commenter' but this page leaves me SO inspired.
ReplyDeleteYou have put in so much thought and I love the results - great directions too!
Thank You.
Thank you so much! I LOVE the different variations of paradox. It was so helpful to see how to do them. Its my new favorite pattern. :-)
ReplyDeletewow, it's so inspired, nice idea
ReplyDeleteVery - very interesting! Thank you very much for the explanation, Margaret!
ReplyDeleteThank you for the wonderful explanations and examples!
ReplyDeleteWow.. this is one of the best and most detailed description of Paradox. Thank you so much for the insight into doing Paradox
ReplyDeleteSuper! Thank you very much!
ReplyDeleteThanks for a very excellent tutorial. I was too sloppy with my paradox zentangling. Your detailed explanation helped to improve my work.
ReplyDeleteGlad it was helpful Joe. Remember to take your time. Many people try to draw quickly (that's like isn't it?) but the zen is in slowing down to focus on your drawing.
DeleteI've just come across Tangle artwork recently, but I have Always loved linear artwork. So to see Paradox, it fits right in my favorite category. What other tangles are in the linear "category that fit with Paradox? Great Work, I love your blog!
ReplyDeleteHi Jeremiah. If you're not yet familiar with tanglepatterns.com it's a wonderful resource for tangles, and a lot of other related things too.
DeleteThere are many tangle patterns that are based on lines rather than 'areas' or 'sections'.
Just for starters I'd suggest: Afterglo, Pixioze, All Boxed Up, Arukas, Auraknot, Groovy, Hibred, Khirkee, Mi2, Meringue, Puffle, Roxi, Bouclé, Rouche, Fife, Sand Swirl, Screen, Dansk, Showgirl, Sqaro, Snood, Tidings, Undu, Warped Eggs, Wonderwall, Yew-Dee, Yuma, and Zewm.
That should keep you out of mischief for a while! ;)
I like it
ReplyDeleteYou work so hard for these wonderful tutorials. I consider you a mentor. Paradox is a fave of mine and I'm not great at it, but, I keep trying.
ReplyDeleteThis tutorial will help a lot. I just need a steadier hand. Huge thankyou
Thanks Chris! Sometimes an unsteady hand can be interesting! I occasionally tangle with my left hand just for something different.
Delete